|
I recently had a training call with a practitioner who purchased my SET-DB program a few months ago, but hadn’t got it started yet. She was mainly confused about how to run the scan on her ZYTO Elite, which she’d owned for two years but had barely used. I was confused at her confusion because I know firsthand how easy it is to run a scan on the Elite. I soon discovered why she was confused: she’d been talking to people from ZYTO. Not to knock the good people from ZYTO but, most of the ones I’ve talked to had no idea what I was doing. You can extrapolate that to say that they had no idea what anyone using their product for sensitivity or allergy elimination treatment was doing. So, I’d like to briefly explain it here. Now, I sold my ZYTO Elite in March, 2013, so I go online to refresh my memory of what their icons looked like. I’ll do my best. Running a sensitivity scan on the ZYTO Elite is easy as clicking on a few icons. Here’s how you do it. 1) Select the patient’s name and start a visit. (Optional: give the visit a name immediately and name it the category the patient is being treated for.) 2) Click the icon of the hand cradle with the thick blue arrow pointing down in the Stressor Panel. 3) Find the category the patient will be treated for. You do this by typing its name into the search field until you see it on the screen. (If you don’t know how to do this you need to watch ZYTO’s online training videos.) 4) Click on the big blue bar about one-third from the left side of the screen to move all the things in your list to the panel on the left. Click run, or whatever the command is to execute the scan. 5) After the scan has run, choose the items you want to treat the patient for by adjusting the dR number. You can adjust it up or down. (This is explained in depth in my Practitioner’s Manual.) 6) That’s all the testing you need to do. You don’t need to balance anything or use filters or do anything else other than imprinting the items you want to treat the patient for in a treatment vial. 7) You now have to get everything in the Stressor Panel down to the Balance Panel. You do this by clicking on the green + button, the one next to the icon with two chain links. Clicking on the green + button up in the Filters area will not do the trick. Make sure everything is select and move the items to the Balance Panel. 8) Imprint the items into the treatment vial by clicking on the icon with a handle cradle and blue rays emanating from out of the hand cradle. It’s between the dropper-bottle icon and the green + icon. 9) Make sure everything is selected and run the imprint. That’s all there is to running a sensitivity scan, so far as the software is concerned. (Other important details are discussed in the manual.) The Elite’s software is very complicated because it can do many other types of testing, testing you don’t need to perform when doing one of my sensitivity elimination treatments. 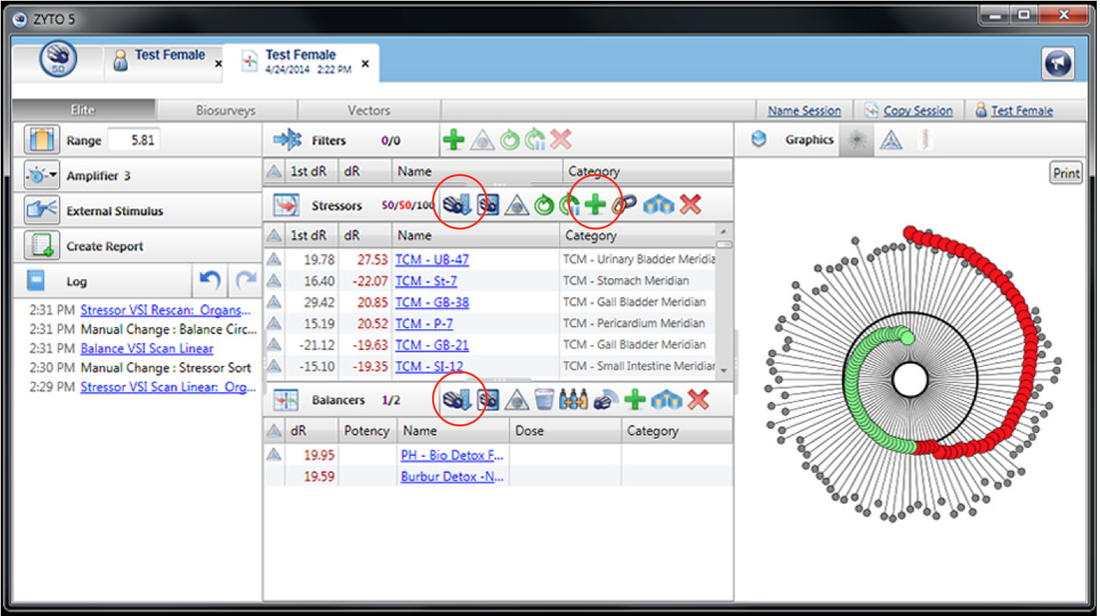
0 Comments
|
AuthorDr. Teryl Boothe and selected guests. Archives
January 2024
Categories
All
|
 RSS Feed